How to Make Delicious Mummy Bark Fast
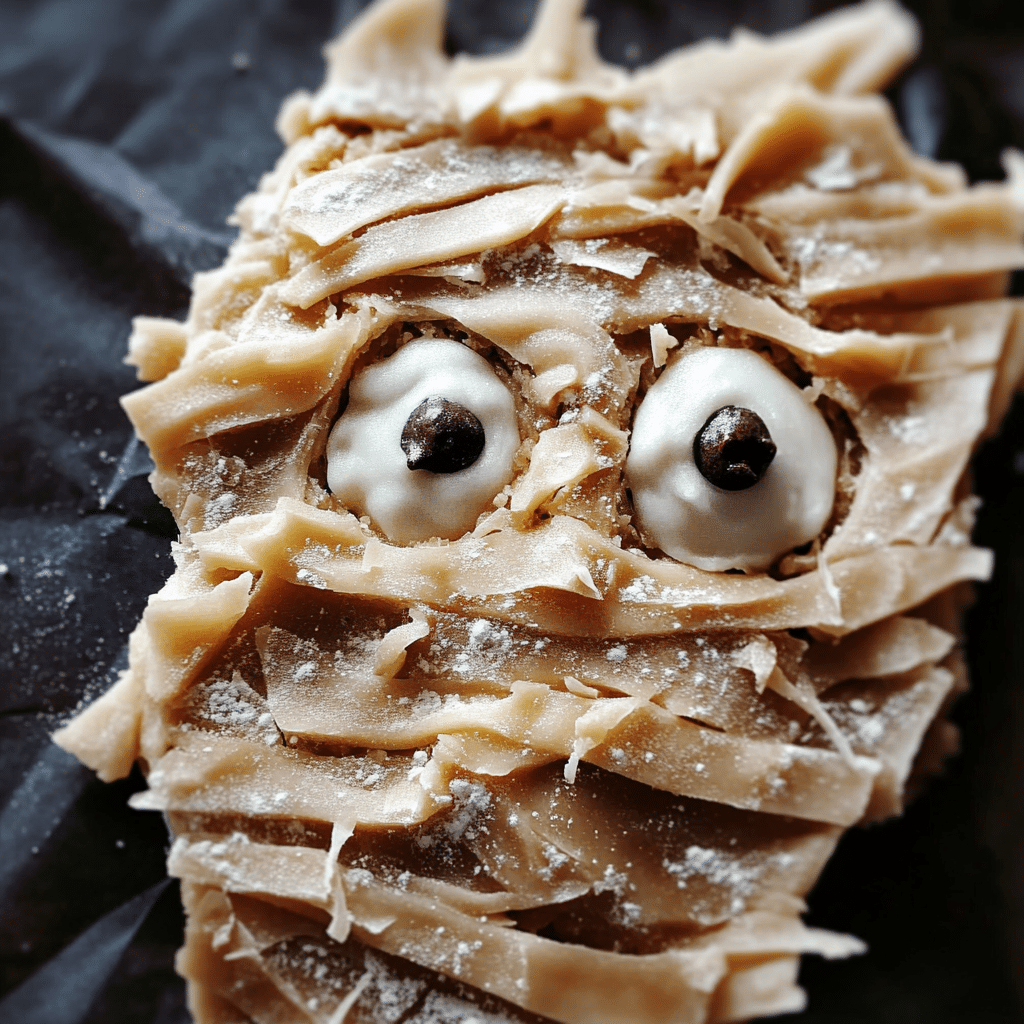
Mummy Bark is the ultimate festive treat that combines quick preparation with irresistible flavors perfect for Halloween parties and spooky get-togethers. This easy-to-make dessert mixes crispy, creamy, and sweet layers into a visually fun snack that’s sure to impress both kids and adults. With simple ingredients and straightforward steps, you’ll learn how to make delicious Mummy Bark quickly, turning your kitchen into a Halloween candy haven in no time.
Why You’ll Love This Recipe
- Quick and Easy: Ready in under 30 minutes, making it perfect for last-minute Halloween plans.
- Kid-Friendly: Simple to make with little hands allowed, plus it’s fun to decorate together.
- Visually Stunning: The spooky mummy design adds a festive touch that delights guests.
- Customizable Flavors: Easy to swap ingredients to match your favorite sweets or dietary needs.
- Perfect Party Snack: Sweet, crunchy, and shareable—an ideal Halloween treat for any crowd.
Ingredients You’ll Need
Gathering just a handful of simple ingredients is all it takes to bring this festive Mummy Bark to life. Each element adds a unique texture or flavor: creamy chocolate for richness, crunchy pretzels for salty contrast, and colorful candy for that spooky aesthetic.
- White Chocolate Chips: Provides the smooth, sweet base that melts beautifully.
- Pretzel Sticks: Offer a crunchy, salty twist that pairs perfectly with the sweet chocolate.
- Halloween Candy Eyes: Essential for creating the iconic mummy look with fun eye details.
- Orange and Black Candy Melts: Adds pops of color to enhance the Halloween vibe.
- Optional: Mini M&Ms or Sprinkles: For extra festive decoration and texture.
Variations for Mummy Bark
Feel free to get creative with this Mummy Bark recipe! It’s incredibly versatile, allowing you to swap ingredients or add your personal twist based on what you have on hand or dietary preferences.
- Dark Chocolate Twist: Substitute white chocolate chips with dark chocolate for a richer flavor.
- Nut-Free Version: Leave out any nuts or nut-based candies to keep it allergy safe.
- Vegan Alternative: Use vegan chocolate melts and skip animal-derived candies.
- Spicy Kick: Add a pinch of cinnamon or chili powder to the melted chocolate for an unexpected zing.
- Gluten-Free: Use gluten-free pretzels to keep it safe for gluten-sensitive guests.

How to Make Mummy Bark
Step 1: Prepare the Base
Line a baking sheet with parchment paper and lay out pretzel sticks in a scattered pattern, creating the skeleton for your mummy’s bandages.
Step 2: Melt the Chocolate
Using a microwave-safe bowl, gently melt white chocolate chips in 30-second intervals, stirring frequently until smooth and creamy.
Step 3: Drizzle the Chocolate
Pour or spoon melted white chocolate evenly over the pretzels, creating layers that mimic mummy wrappings but still letting the pretzels peek through.
Step 4: Add Eyes and Decorations
Before the chocolate sets, place Halloween candy eyes strategically on the bark to give your mummy its spooky gaze; sprinkle colorful candy melts or mini M&Ms for extra festive flair.
Step 5: Chill and Set
Place the baking sheet in the refrigerator for about 15-20 minutes or until the chocolate hardens completely.
Step 6: Break into Pieces
Once set, remove from the fridge and gently break the bark into rough, rustic pieces perfect for serving.
Pro Tips for Making Mummy Bark
- Use Quality Chocolate: High-quality chocolate melts more smoothly and tastes richer, making your bark irresistible.
- Don’t Overcrowd: Spread pretzels with some gaps so the chocolate can coat them evenly without clumping.
- Work Quickly: Before chocolate hardens, add eyes and decorations to ensure they stick firmly.
- Chill Thoroughly: Proper chilling ensures easy breaking and helps the bark hold its shape perfectly.
- Store Properly: Keep your Mummy Bark in an airtight container to maintain crispness and freshness.
How to Serve Mummy Bark
Garnishes
Sprinkle the serving platter with extra candy eyes, mini pumpkins, or edible glitter to elevate the spooky presentation and make each piece pop.
Side Dishes
Pair your Mummy Bark with other Halloween favorites like caramel apples, popcorn balls, or spiced cider to create a festive dessert spread that tempts every sweet tooth.
Creative Ways to Present
Serve pieces in themed paper cones, clear bags tied with orange and black ribbons, or on a rustic wooden board decorated with faux spider webs for the ultimate Halloween flair.
Make Ahead and Storage
Storing Leftovers
Place leftover Mummy Bark in an airtight container at room temperature or in the fridge if your environment is warm; it stays fresh for up to one week.
Freezing
Wrap pieces tightly in plastic wrap and store in a freezer-safe bag for up to three months; thaw at room temperature before serving to keep texture intact.
Reheating
Mummy Bark doesn’t need reheating; serving it cool preserves its crunch and chocolate coating, making it the perfect grab-and-go snack for any Halloween party.
FAQs
Can I use different types of chocolate to make Mummy Bark?
Absolutely! Feel free to experiment with milk, dark, or white chocolate melts depending on your taste preferences; each type brings a unique flavor profile.
How long does Mummy Bark last?
When stored properly in an airtight container, Mummy Bark remains fresh and crunchy for up to one week at room temperature.
Is this recipe suitable for kids to make?
Yes! This recipe is great for involving kids, especially when decorating the bark with candy eyes and colorful sweets.
Can I make Mummy Bark gluten-free?
Yes, just use gluten-free pretzels and double-check that all candies and chocolates are gluten-free to keep the treat safe.
What if I don’t have candy eyes?
No worries! You can use small chocolate chips, colored icing, or even draw eyes with melted chocolate using a toothpick.
Final Thoughts
Mummy Bark is a delightfully quick and fun Halloween treat that brings festivity and flavor together in every bite. Whether you’re whipping it up for a kids’ party or adding a charming snack to your spooky celebrations, this recipe is sure to become a seasonal favorite. Give it a try and watch as your guests’ faces light up with each spooky, sweet chunk!